Skimboarding Video put together by the Gardner Brothers.
Wednesday, August 27, 2008
Skimboarding Video #5
Here is some footage of the 2008 Virgin River Classic put together by Extreme Outdoor Supply
Tuesday, August 26, 2008
Skimboarding Training - Balance: Build a Balance Board
One way to improve your balance that can also be pretty fun is to use a balance board.  There are several brands out there, but they run about a $100. Ouch. Not to worry, you can make your own for way cheaper. First you’ll need something for the board to roll on. At Home
 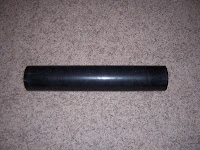 Depot they have 2 foot long sections of 4 inch diameter PVC for about $6. Once you’ve got your PVC roller, you’ll need a board. A ½ inch to ¾ inch piece of plywood will do the trick. You can pick up a 2x4 foot piece at Home Depot for about $10. If you are just getting started, go with a large board, use dimensions of 40” x 17”. For more advanced riders, use dimensions of 38”x 12”. To make a pattern, fold the paper into fourths. Along the outside edge (not the folded edge) draw the curve of the board then cut along this curve. When you unfold the paper, your pattern should be symmetric along both the length and width.
 Trace the pattern onto your plywood and the cut it out using an electric jig saw. Use some sandpaper and sand it smooth so you don’t get splinters.
 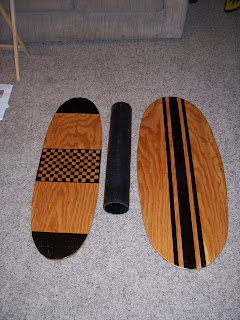 You can use some paint if you would like to give it a little of your personal style. If you’ve got a few more bucks you can put some polyurethane or varnish on it if there is bare wood showing, but it’s not necessary as your balance board will not be in the water. (Unless you love it so much you want to use it everywhere, including the shower, which is not recommended.) Now you should be ready to ride. You might want to start out on a carpeted surface, as that will slow down the roller a bit. As you become more proficient you can move to a bare surface. Using a wall or a chair to steady you until you get the hang of it is a good idea. As you become more advanced you can begin to practice some tricks. Tricks that transfer well to skimboarding would be body varials (jump and spin your body 180 degrees), shuvits, and ollies. Balance and foot placement are crucial when landing these tricks, both on the balance board and on your skimboard.
There are several brands out there, but they run about a $100. Ouch. Not to worry, you can make your own for way cheaper. First you’ll need something for the board to roll on. At Home  Depot they have 2 foot long sections of 4 inch diameter PVC for about $6. Once you’ve got your PVC roller, you’ll need a board. A ½ inch to ¾ inch piece of plywood will do the trick. You can pick up a 2x4 foot piece at Home Depot for about $10. If you are just getting started, go with a large board, use dimensions of 40” x 17”. For more advanced riders, use dimensions of 38”x 12”. To make a pattern, fold the paper into fourths. Along the outside edge (not the folded edge) draw the curve of the board then cut along this curve. When you unfold the paper, your pattern should be symmetric along both the length and width. Trace the pattern onto your plywood and the cut it out using an electric jig saw. Use some sandpaper and sand it smooth so you don’t get splinters.
  You can use some paint if you would like to give it a little of your personal style. If you’ve got a few more bucks you can put some polyurethane or varnish on it if there is bare wood showing, but it’s not necessary as your balance board will not be in the water. (Unless you love it so much you want to use it everywhere, including the shower, which is not recommended.) Now you should be ready to ride. You might want to start out on a carpeted surface, as that will slow down the roller a bit. As you become more proficient you can move to a bare surface. Using a wall or a chair to steady you until you get the hang of it is a good idea. As you become more advanced you can begin to practice some tricks. Tricks that transfer well to skimboarding would be body varials (jump and spin your body 180 degrees), shuvits, and ollies. Balance and foot placement are crucial when landing these tricks, both on the balance board and on your skimboard.
Sunday, August 24, 2008


Saturday, August 23, 2008
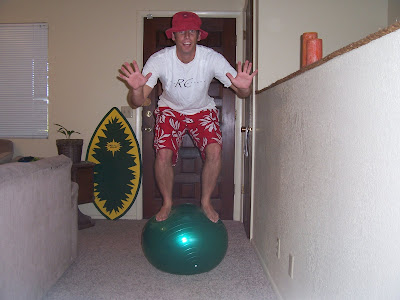
Skimboarding Training - Balance: Exercise Ball
Balance is crucial to being a good skimboarder. By improving your balance, you will also improve your board riding skills. One way that you can improve your balance, even when you can’t skim, is by using an exercise ball. With bare feet, stand on the top of the exercise ball. At first you may want to use a chair or some long sticks to help you balance, but after a while you be able to stand on the ball without the aid of any supports. Be careful, you may fall a few times before you get the hang of it so you might want to start on grass or somewhere relatively soft and without anything that you may fall on or into. In addition to being a great way to improve your balance, it is also a great workout for your leg muscles. To add some difficulty once you have the hang of it here are a few things you can try. Have someone play catch with you while you are balancing on the ball. Do squats on the ball. Jump up in the air and land back on the ball. Do a body varial (jump and spin your body 180 degrees and land back on the ball). If you can do a body varial on the ball, you should have no problem landing pop shuvits!
Wednesday, August 20, 2008
Join the Inland Skimboarding Community
Are you ready to get involved with the inland skimboarding community? Do you want to be able to upload skimboarding pictures and video to share with other skimmers? Do you have skimboarding questions and topics you would like to discuss? Well now you can. Inland Skimboarding has groups on both Facebook and Myspace.


Monday, August 18, 2008
How to make a Skimboard
How to make a skimboard 101: A beginners guide
Here you'll find all the instructions and tips to help you make your very own skimboard. These are kind of "down and dirty" instructions that will help you build a board quickly and with materials that will be easily available at stores like Walmart or Home Depot. If you've been making skimboards for a while or you want to use professional grade materials, then there probably isn't much information here that you don't already know. You'll want to check out the advanced How to Build a Skimboard Video. But if you are making your first board and want to use materials that you'll be able to pick up at your local stores so you can just get out there and get skimming, then read on. I have pictures to help you as you go. I would suggest that you read through all the instructions first before you get started.
Wood
 First you need to find a piece of wood. I would suggest half inch plywood. Half inch works well, with or without fiberglass. I've used three-eighths, but if I don't use fiberglass on it, it seems to crack after a while if I ollie a lot and hit rails. Anything bigger than half inch starts to get real heavy real fast, but will probably still work.
A half inch 4x8 foot sheet of plywood can be purchased for around $20. You only need a fourth of this (2x4 foot) so if you have a few friends, go in together on one. If it's just you, and you don't want to make 4 boards, most lumber yards will cut and sell you what you need. If you go to Lowes or Home Depot, they have 2x4 foot pieces already cut.
PatternOnce you've got your wood, place your pattern down and trace around it onto the wood. As far as a pattern goes, this is kind of a personal thing. First I would vist some of
 the different skimboarding manufacturer sites and get some Ideas about skimboard shapes. To make a pattern, you need a large piece of paper. If you don't have a piece of paper large enough, tape a few newspapers together. To ensure symmetry in your board, fold the paper in half, then draw half the pattern on the paper. Cut it out and unfold it so that you have a complete skimboard pattern. Now your ready to trace it on the wood. When you trace your pattern out, you want to make sure that the grain in the wood is going the long way on your board. If when you buy your wood, you buy just enough for one board and the lumber place cuts it, make sure it is cut so that the piece you get has the grains going the long way. If you are making a board(s) out of one large piece of wood, still make sure the grains are going long-ways.
Cutting out your skimboard
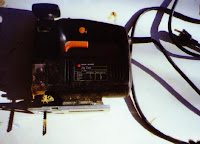 To cut out your skimboard you will need an electric jig saw. If you don't have one ask around the neighborhood. They are fairly common. f yo
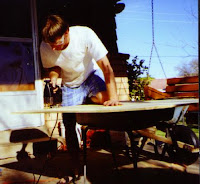 u still can't find one, you might consider investing in one, they are not too expensive and come in handy for all sorts of things. I've seen them at Walmart for as low as $15.00 (on sale).
Once you have your saw, cut out your board following the outline that you traced on the piece of wood.
Top, Rocker and SandingOnce you get your board cut out you'll need to decide which side should be the top. The board will naturally curve a bit in one direction. Lay you board on something flat. Try both sides to see which way the board curves. You want the nose to curve up. If it curves down then it will dive into the water. This curve is called rocker and you also need to decide how much rocker you want. I personally don't like a lot of rocker because I mostly skim flatland and it tends to slow the board down some, so I rarely try to put more rocker in my boards. I just go with the little bit of natural bend in the board.
 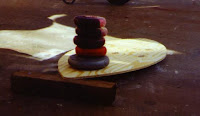 But it's a personal thing and if you want more rocker, you can soak the board in water, then put a board or something under the nose and weights on the top to bend the nose up. You'll probably need to leave it like this for a few days to a week.
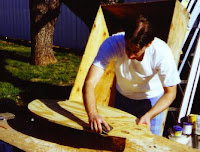
Now that you've decided which side is the top you'll want to sand your board. You'll have to sand more or less depending on what grade of plywood you purchased, and how smooth you want your board.
Top, Rocker and SandingOnce you get your board cut out you'll need to decide which side should be the top. The board
 will naturally curve a bit in one direction. Lay you board on something flat. Try both sides to see which way the board curves. You want the nose to curve up. If it curves down then it will dive into the water. This curve is called rocker and you also need to decide how much rocker you want. I personally don't like a lot of rocker because I mostly skim flatland and it tends to slow the board down some, so I rarely try to put more rocker in my boards. I just go with the little bit of natural bend in the board.
  But it's a personal thing and if you want more rocker, you can soak the board in water, then put a board or something under the nose and weights on the top to bend the nose up. You'll probably need to leave it like this for a few days to a week.
Now that you've decided which side is the top you'll want to sand your board. You'll have to sand more or less depending on what grade of plywood you purchased, and how smooth you want your board.
Painting 
Your board should now be ready to paint. There are two main kinds of paint, oil base paint and water base (latex) paint. If you’re not going to fiberglass your board you want to use a polyurathane enamel. It will make your board smooth and fast and give it a good waterproof coat. You can usually pick up a 32 oz can for between $6-$8 and it should be enough to do a few boards. Put on 3 or 4 coats. Once you have your board covered with the polyurathane paint you can now put any design you want on it. If you’re going to fiberglass your board, then you can use latex paint if you want. The advantage of latex paint is that it is much easier to clean up. You can just use water. With the oil base enamel you have to use paint thinner or solvent to clean up. The disadvantage of latex paint is that it won’t wear as well on your skimboard. That is why if you’re not going to fiberglass, you definitely want to go with the oil because it will wear much better. If you going to fiberglass, it doesn’t matter, because the paint will be under the resin.
To Fiberglass or not to fiberglass, that is the questionNow you need to decide whether to fiberglass your board or not. Here are some of the advantages and disadvantages of fiberglass as compared with other options.
Waterproofing your board is an important consideration. Keeping water out of your board is one of the biggest factors in how long your board will last. Fiberglass is waterproof so anywhere you put this on your board it will keep the water out. Another option is a good polyurathane paint. But paint will wear off much quicker.
Fiberglass will help strengthen your board. I ride pretty aggressively and have cracked a few boards without fiberglass. Mostly because of ollieing and riding rails. I've never cracked one with fiberglass. On the other hand, if this is your first board and you haven't skimmed much a board without fiberglass would be just fine.
Another thing that fiberglass helps with is dings and scratches. Remember that you’re riding on sand, which is just like sanding the bottom of your board with sandpaper. But fiberglass is much tougher than paint. With just the paint, the wood is exposed if it gets scratched, and this leads to water getting into your board.
Your option without fiberglass is to just pay attention to your board. If you see a scratch or paint is coming off, paint over it so that water doesn't get in the wood. After each time you skim, look over your board and see if there is any place water could get in and then paint over it for the next time. I've had plenty of boards without fiberglass last quite a while by doing just that.
One of the disadvantages of fiberglass is that it can be really hard to work with. Mixing the resin just right can be kind of tricky. Then you only have a limited amount of time to work with it.
Another problem is that most of the resins that you get at your local stores are not finishing resins so they remain tacky after they harden which makes them a real pain to try to sand.
If you have not used fiberglass and resins before, I would suggest you first make a board without the fiberglass so you can get out there skimming, then try your hand at a fiberglass board later. If you are going to fiberglass your board here's what you'll need.
· Fiberglass cloth. I've been able to get 2x4 foot pieces at Walmart for about $5.

· Fiberglass resin. A 32 oz. can is about $10.00 at Walmart, about the same at Home Depot.
· Something disposable to mix the resin in. · Something disposable to mix the resin with.
· A spreader or disposable brush.
· Razor blade, knife or scissors.
I usually only put fiberglass cloth on the bottom of my boards as  that is the side that takes the most abuse. Lay the fiberglass cloth over the board so that it completely covers it. You can trim it up a bit now with scissors if you want or you can wait until later, it doesn't matter. Get your spreader or brush ready, because remember you will only have a limited amount of time to work with the resin. Read the instruction on the resin can carefully and completely. Also read the warnings and safety precautions. I would suggest
  the use of at least safety glasses and maybe some sort of disposable gloves. The catalyst is usually the most dangerous and you don't want to get any squirted in your eye. Measure out the amount of resin you want. Usually to saturate the cloth completely on the first coat I use between 8 to 10 oz. To measure out my resin I find a disposable container/cup and fill it with 10 oz of water. Then I make a mark at the water level. Then empty it and dry it out. Now I have a mark so I can measure out exactly the right amount of resin. Get a stick or something to mix the resin with, then add the catalyst. Follow the instruction on the resin can as to how much catalyst to add. (Many times it will tell you so many drops per oz.) Then mix. It is important to make sure the catalyst and resin is mixed well. I stir for at
  least a minute, maybe more. Once you're through mixing, pour it all out over the board. You don't want to keep the resin in the container because it will harden up quicker. The more you spread it out, the longer you'll have to work with it. Start spreading it all over the board making sure the cloth is saturated with resin everywhere. Try to work fast because once it starts to harden there is no more working with it. I've ended up with big clumps of resin
 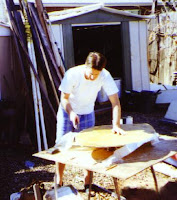 on my boards that has set up before I had time to get it all spread out and there's nothing you can do but sand, cut and chip it off and start over. Hopefully, once you get your first coat on, you will no longer be able to feel the texture of the cloth and you have a smooth surface. If not, you can add additional coats of resin. It seems that the thicker (4 oz and up as opposed to thin 1 or 2 oz coats) you put on the additional coats, the smoother it is
  and the easier it is to sand if needed. The thin coats seem to be more tacky. Sanding is not easy, because the fiberglass gums up the sandpaper. Use a razor blade or knife to cut the excess cloth around the edges of your board and then sand this smooth. Now you can put a coat of resin on the top. You’ll need a bit less resin for the top because you are not having to saturate the cloth. Probably around 6 oz would do. Make sure that you get the rails (sides) of the board.
 that is the side that takes the most abuse. Lay the fiberglass cloth over the board so that it completely covers it. You can trim it up a bit now with scissors if you want or you can wait until later, it doesn't matter. Get your spreader or brush ready, because remember you will only have a limited amount of time to work with the resin. Read the instruction on the resin can carefully and completely. Also read the warnings and safety precautions. I would suggest
 the use of at least safety glasses and maybe some sort of disposable gloves. The catalyst is usually the most dangerous and you don't want to get any squirted in your eye. Measure out the amount of resin you want. Usually to saturate the cloth completely on the first coat I use between 8 to 10 oz. To measure out my resin I find a disposable container/cup and fill it with 10 oz of water. Then I make a mark at the water level. Then empty it and dry it out. Now I have a mark so I can measure out exactly the right amount of resin. Get a stick or something to mix the resin with, then add the catalyst. Follow the instruction on the resin can as to how much catalyst to add. (Many times it will tell you so many drops per oz.) Then mix. It is important to make sure the catalyst and resin is mixed well. I stir for at
  least a minute, maybe more. Once you're through mixing, pour it all out over the board. You don't want to keep the resin in the container because it will harden up quicker. The more you spread it out, the longer you'll have to work with it. Start spreading it all over the board making sure the cloth is saturated with resin everywhere. Try to work fast because once it starts to harden there is no more working with it. I've ended up with big clumps of resin
  on my boards that has set up before I had time to get it all spread out and there's nothing you can do but sand, cut and chip it off and start over. Hopefully, once you get your first coat on, you will no longer be able to feel the texture of the cloth and you have a smooth surface. If not, you can add additional coats of resin. It seems that the thicker (4 oz and up as opposed to thin 1 or 2 oz coats) you put on the additional coats, the smoother it is
  and the easier it is to sand if needed. The thin coats seem to be more tacky. Sanding is not easy, because the fiberglass gums up the sandpaper. Use a razor blade or knife to cut the excess cloth around the edges of your board and then sand this smooth. Now you can put a coat of resin on the top. You’ll need a bit less resin for the top because you are not having to saturate the cloth. Probably around 6 oz would do. Make sure that you get the rails (sides) of the board.
Skim
Once the resin has hardened , get a little surf wax to put on the top and skim, skim, skim.
Once the resin has hardened , get a little surf wax to put on the top and skim, skim, skim.
Sunday, August 17, 2008
Skimboarding Rail Safety Tip
One place on many rails that can be very dangerous for both the skimboarder and his/her board is the front end. The edge of the pvc pipes can be very sharp. In this first video the skimboarder attempts a 360 shuvit before a small ollie on slider but doesnt stick the shuvit and falls towards the slider taking a good blow to the back.
In this next video the skimboarder wrecks on a rail at the Virgin River Classic Skimboard competition in St. George Utah. His left middle finger gets stuck in one of the pipes in the second half of the rail as he falls forward.
One little modification to the rails could have helped save a lot of  pain and agony. Rails can be made much safer if a piece of pvc is added at the end of the rails perpendicular to the length of the rail. This will save the bottom of your board as well as your body.
Saturday, August 16, 2008
Everything you need to know about waxing your skimboard
 Waxing. I’m sure most of you ladies suddenly started to cringe. Not to worry, waxing a skimboard is far less painful, though it doesn’t make your legs look any better. For you snowboarders or skateboarders, skimboarders use wax a bit differently than you do also. Snowboarders often put wax on the bottom of their boards to help protect it and give it a faster, smoother ride. Skateboarders often apply wax to curbs and rails to help their boards slide better on them. Wax is used on a skimboard for just the opposite reason. It’s to stop your feet from sliding around on the board. Surfboard wax is applied to the top of the skimboard to make it sticky.
There are several different companies that make surfboard wax. Some of the more popular brands are Sticky Bumps, and Mr. Zogs Sex Wax. Surfboard wax generally comes in four types: cold, cool, warm, and tropical. The different types are rated for different water temperature ranges. If wax is used in water that is colder than it’s rating, it will be hard and not as sticky. If wax is used in water that is warmer than it’s rating, it will just melt and come off the board. Each brand has specific temperatures that the wax is rated for and can usually be found right on the package. But to just get an idea, here are some general temperature ranges:
Cold – 58 F and below
Cool – 58 F to 68 F
Warm – 68 F to 78 F
Tropical – 75 F and above
Cold – 58 F and below
Cool – 58 F to 68 F
Warm – 68 F to 78 F
Tropical – 75 F and above
 You can obviously purchase surfboard wax at a surf shop, but if you live in a place that’s not near the beach there are some other options. Many other board shops (skateboard, snowboard, etc) will carry surfboard wax. Also sporting goods stores sometimes carry surfboard wax. There are hundreds of places online where you can buy surfboard wax. It will usually run between $1 and $2.
Once you have your wax, you need to apply it to your board. The following steps will help you.
1. Make sure the deck (top) of your board is nice and clean. If you need to remove an old coat of wax, scrape most of it off with a plastic scraper. You should be able to remove the remaining wax by melting it with a hair blower and wiping it off.
2. You’re first going to apply a base coat. For the base coat, regardless of the temperature of the water you’re going to be skimboarding in, use a high temperature wax (tropical). Apply the wax to the top of the board using a circular motion. Once you have covered the board using a circular motion, you’re going to go over it two more times. Once in a straight motion from nose to tail, and once in a straight motion from rail to rail (side to side).
3. After the base coat is applied, choose a wax that is rated for the temperature of water you will be skimboarding in. Apply a layer of this wax using a circular motion. Ideally you will end up with lots of little bumps of wax all over the board.
Well, now you know everything you need to know about waxing your skimboard, what kind of wax to use, where to find it, and how to put it on. So now get out there and skim, skim, skim!
Wednesday, August 13, 2008
The Virgin River Skimboarding Campaign
The intensity on my face was that of a lion staring down his prey. I gazed down the river. The water was gently flowing, shallow and lazy. But not for long. It would soon be conquered. A drop of water fell from my bangs. I could almost hear the splash as it hit my nose. All other sounds had been drowned out by my focus. It seemed amazing that this half-inch piece of plywood could carry me across the top of the three inch deep water. But carry me it would, if I was fast enough and my footing was sure.
Like a sprinter springing from the starting blocks I started my campaign. This river was mine! Water splashed up beside me with each step, but I paid no mind. With the accuracy of a hop scotch champion I tossed the piece of plywood down in front of me. The smooth fiberglass coating made it glide across the top of the water with ease. The narrow point of the skimboard cut through the water like a knife. With the sure footedness of a mountain goat, I sprang into the air and came down onto the board…well, sort of.
The board and the river joined forces and fought back. My front foot landed a little right of center and only the big toe of my trailing foot made it on to the board. At this moment I sensed impending doom. Because of the unbalanced distribution of my weight and a lack of sure footing, this campaign took a turn for the worse, literally. The skimboard spun out from underneath me. To try to keep myself upright, my front foot came off the board and as it came down the still spinning board smacked into my ankle. The first casualty. The board, still spinning, swept my back foot out from underneath me, which sent me flying through the air. Visions of Pete Rose sliding head first into home come to mind. My sight was a blur of sand and water as my body came to rest.
Just as I thought the battle was over the board came floating by and clunked my elbow. “Ouch!” I yelled, as my focus drained from me. I began to be aware of my surroundings again. The laughter of my friends could be heard over the water rippling past my ears. “Thanks a lot guys,” I said as I stood up and surveyed the situation.
That was my first experience skimboarding. I was hooked. How could I not have been? A sport that challenged me right from the beginning. If it’s summer you’ll probably find me down at the river telling the new skimboarders, “Hey, if you’re not falling, your probably not trying hard enough!”
Sunday, August 3, 2008
Friday, August 1, 2008
Inland Skimboarding Spots
Do you know a good inland/flatland skimboarding spot or are you looking for one close to you. Check out the skimspots page. Here is the link.
http://skimspots.proboards54.com/index.cgi
http://skimspots.proboards54.com/index.cgi
Subscribe to:
Posts (Atom)

Virgin River water levels

Check out how high the river is before you go.